Wednesday, October 24, 2012

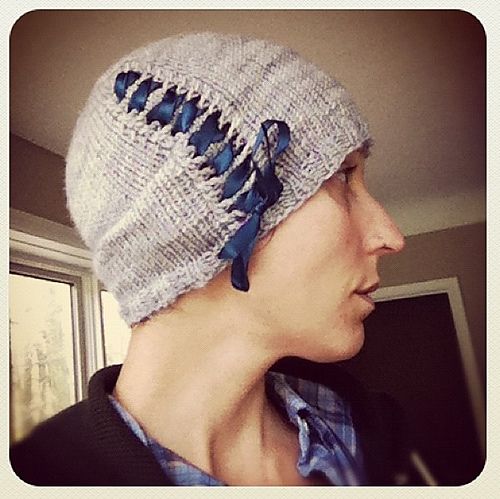
In a cinch!


** Link to Ravelry Project Page**  

Materials 
- Worsted weight yarn (I used Madeline Tosh Merino in Silver Fox)
- circular needle/dpns 4us and 7us
- length of ribbon to lace through eyelets

Pattern
- On smaller needles cast on 84 sts and join in round without twisting placing a stitch marker to indicate start of round
- k2p2 ribbing for 5 rounds
- Change to larger needles and knit one round (no more purling)
-- eyelet round-- *knit 5 stitches, k2tog, yo, knit 3 sts, yo, ssk, finish knitting round
- Knit 2 rounds*
- Knit from * to * until hat measures 7  inches from cast on edge
- Knit --eyelet round--
-- decrease round-- Knit 12sts, k2tog, repeat around needle (make sure to change to magic loop method, 2 circulars or continue with dpns when necessary)
- Knit 1 round
- Knit --eyelet round-- (this will be the last eyelet round)
-- decrease round-- Knit 11sts, k2tog, repeat around needle
- Knit 1 round
-- decrease round-- Knit 10 sts, k2tog, repeat around needle
- Repeat these last 2 rounds knitting 1 less stitch each decrease round (next round is knit 9sts, k2tog, then 8, then 7 and so on) until there are 5 sts between each decrease and then decrease every round until there are 6 sts left on the needles
- Break yarn and weave through stitches.
- Weave in all ends
- Weave the ribbon through the eyelets and tie a pretty bow!  
--- Depending on how many eyelets you make you might have to flub where the ends come through to tie the bow.  You shouldn't be able to tell once the bow is tied!  --- 

****Errata-- decrease pattern changed***


Sunday, July 15, 2012

Easy Peasy Legwarmers


***Link to Ravelry Project Page***
Materials
-2 Skeins Bulky weight yarn 100g/3.5 oz  (I used Bernat Alpaca Natural Blends)
-Size 7us and 9 us needles (circulars or dpns)

Gauge
- 4 stitches per inch on larger needles

Size
- My calf measures 15 inches around 

Pattern
- On smaller needles cast on 44 stitches
- Join in round (careful not to twist) and do k2 p2 ribbing for 4 inches
- Switch to larger needles and knit every stitch and round for a total of 12 inches from cast on edge
- Switch back to smaller needles and knit 4 more inches of 2 by 2 ribbing
- Cast off loosely
- Weave in all ends

Tuesday, July 10, 2012

Butt-On Toque


 ***Link to Ravelry Project Page***
Materials 
-DK weight yarn (I used Madeline Tosh Merino DK in Grasshopper)
-US 7 circs/dpns
-Stitch markers to mark beginning of round and decrease points
-1 RAD button!
Pattern
- Cast on 84 sts and join in the round with out twisting. Put a marker to indicate start of round 
- Knit every round until the hat is nice and slouchy (mine was approx 8 inches with the edge rolled)
- Knit 14 sts, place marker. Repeat across round for decrease points
- Begin decreases-- k12, k2tog, repeat across the round
- Knit 2 rounds
- K11, k2tog, repeat across the round 

- Knit 2 rounds  
- K10, k2tog, repeat across the round  
- Knit 1 round  
- Knit9, k2tog, repeat across the round  
- Knit round 
- Repeat until you k2tog across the round and cut a tail and sew it through the remaining stitches…
- Get a rad button and sew it on with a bit of the hat gathered under it
- Weave in all the ends and DONE!

Tuesday, March 13, 2012

Ribbed for MY Pleasure

*** Link To Ravelry Project Page***

Materials
- Worsted weight yarn
- US 4 circs/ DPNs
- US 7 circs/ DPNs
- Stitch marker for beginning of round and to mark where decreases go (if needed)

Pattern
- Cast on 90 sts
- Join in round (being careful not to twist) Put a marker at beginning of round and Knit for 1.5 inches
- Purl row (will act as the edge once the knitting is folded under for the "hemmed" edge)
- Knit 14 rounds
- On 15th round pick up cast on edge and knit it together with this next round (you could do a provisional cast on to start with instead of picking up the stitches)
- Change to US 7 needles and Knit 3 rounds
- Purl round
- Knit 1 round
- *Knit 9sts, m1* repeat the increases to marker (100 sts on needle)
- Knit 6 rounds
- Purl round
- Knit 1 round
- *Knit 10 sts, m1* repeat increases to marker (110 sts on needle)
- Knit 6 rounds
- Purl round
- Knit 1 round
- *Knit 11 sts, m1* repeat increases to marker (120 sts on needle)
- Knit 6 rounds
- Purl 1 round
- Knit 8 rounds
- Purl round
- Knit 8 rounds
- Purl 1 round
- Knit 1 round
- *Knit 10 sts, k2tog* repeat decreases to marker (110 sts)
- Knit 3 rounds
- *Knit 9 sts, k2tog* repeat decreases to marker (100 sts)
- Knit 2 rounds
- *Knit 8 sts, k2tog* repeat decreases to marker (90 sts)
- Purl round
- Knit 1 round
- *Knit 7 sts, k2tog* repeat decreases to marker (80 sts)
- Knit 3 rounds
- *Knit 6 sts, k2tog* repeat decreases to marker (70 sts)
- Knit 2 rounds
- Purl round
- *Knit 5 sts, k2tog* repeat decreases to marker (60 sts)
- Knit 2 rounds
- *Knit 4 sts, k2tog* repeat decreases to marker (50 sts)
- Knit 2 rounds
- *Knit 3 sts, k2tog* repeat decreases to marker (40 sts)
- Knit 1 round
- Purl round
- *Knit 2, k2tog* repeat to marker (30 sts)
- Knit 1 round
- *Knit 1, k2tog* repeat to marker (20 sts)
- K2tog across round
- Break yarn and pull through remaining sts
- Weave in ends

Saturday, March 3, 2012

Noro Striped Scarf of AWESOMENESS! Alternate Pattern


***Link To Ravelry Project Page***

------ This is pretty much the exact same basic pattern as the Noro Striped Scarf of AWESOMENESS! The changes that I made for this one include doing a couple more increases on the neck edge. This will make the neck edge get a little longer, a little quicker. I like the idea of that so it will be easier to wrap around the neck, with out having so much fabric in the front. The changes will be made in PURPLE through out the pattern.

Yarn- 2 balls of Noro Kureyon Sock or Noro Silk Garden Sock in 2 different colorways
--- You can sub in an alternate yarn in the same weight or use what you want but adjust the needle size to work with your yarn weight.

Needles- US4 circular with a long cord so the stitches are not all jammed together

Notions- Stitch markers, yarn needle

Skills Needed- Cast on, Picking up stitches, Make1L increase (m1L), Make1Right increase (m1R), Yarn over, Cast off
-M1L on the purl side
-M1R on the purl side (MY instructions for this will be at bottom of pattern)

--This pattern is knit in stocking knit stitch, so knitting and purling alternate rows


Pattern-
-- Start by making a garter tab--
- Cast on 3 stitches in colorway number one.
- Knit 5 rows in garter stitch.
- Knit those 3 stitches, then pick up 3 stitches from the side of the knitting and then 3 stitches from the cast on edge (9 stitches on needle)
-Wrong side of scarf/set up row- K2, P2, pm (place marker), P1, pm, P2, K2
- Right side of scarf- *K2, m1L, K2, m1R, sm (slip marker), slip stitch, sm, m1L, K2, M1R, K2
- K2, P4, sm, P1, sm, P4, K2*
-Repeat from * to * for as many rows as you would like of the first colorway. You can do a few or a bunch, it is totally up to you!
---When you want to bring in the new colorway start on a right side row leaving the first colorway yarn dangling start knitting with the new one, following the pattern from * to * the same as before. ALTERNATE PATTERN- after the first K2 stitches on the WRONG SIDE rows do a M1L (but purling the stitch not knitting) Continue to purl across row until you are at the last 2 knit stitches. M1R (but purling not knitting), K2 last stitches. So for the alternate pattern you will be increasing on BOTH SIDES (right and wrong) of the scarf on ONLY the SECOND COLOR rows. You can continue to do the increasing on just the right side rows while using the first colorway. If you want to do the purl bump row while using the second colorway just so regular M1L and M1R's on both right side and wrong side of scarf. Knit those 2 rows in pattern then drop that yarn and pick back up the first colorway. PLEASE make sure to carry the yarn up the side LOOSELY so that edge does not pull in!!!
----A trick that I used to keep it loose was, in between those first 2 KNIT stitches of every row do a yarn over. When you get to that spot on the next row DO NOT KNIT THE YARN OVER just drop it. The extra yarn will just make those edge stitches looser. It works like a dream. I do it on both sides just so it is easier for me to keep in that pattern.

---The stitch in between the markers gets slipped every right side row and purled on the wrong side rows. This gives a wicked column running up the center of your scarf.


----The purl bumps are made by knitting a row on the "wrong side" instead of purling it. I did mine randomly when I felt like it or if I really loved the color that I was knitting. Have some fun with it! Show that yarn off!

- Keep knitting in pattern switching yarns every 2 rows until your scarf is big enough for your liking. Try it on (on scrap yarn if your circular needles are not big enough) and see if you like how long the "neck edge" is, if it wraps enough around. If yes then start on border, if not then keep knitting!

--Border--
I prefer the look of a solid garter stitch border. It gives a nice solid edge to the scarf and best of all, when knit long enough it keeps the edge from curling. Feel free to substitute in any sort of edging you like. Make it your own!
- Using only 1 colorway now (you can cut the other yarn off leaving a nice tail to weave in) keeping with the increase pattern in between the * to * knit BOTH rows until your border is as wide as you want it. Mine are about 2- 3 inches wide. I also like to continue to do the center slipped stitch through out the border.
-CAST OFF LOOSELY!
- Weave in ends and you are done!

--- Instructions for M1L/R while purling---
If you do not already know how to do M1L/R follow the "increases" link on the right hand side of the blog to knittinghelp.com.
M1L---- Lift the bar as you usually would for a M1R, purl into the FRONT of the stitch
M1R---- Lift the bar as you usually would for a M1L, purl into the BACK of the stitch. This can be a little tricky and I usually use my fingers to help push the yarn and needles around to do what I want them to do! PLEASE NOTE that this is how I do it, and if it doesn't seem right them definitely do whatever increases you are comfortable with. I think it looks good and seems to work for me. GOOD LUCK!
Friday, March 2, 2012

Noro Striped Scarf of AWESOMENESS!


***Link To Ravelry Project Page***

Yarn- 2 balls of Noro Kureyon Sock or Noro Silk Garden Sock in 2 different colorways
--- You can sub in an alternate yarn in the same weight or use what you want but adjust the needle size to work with your yarn weight.

Needles- US4 circular with a long cord so the stitches are not all jammed together

Notions- Stitch markers, yarn needle

Skills Needed- Cast on, Picking up stitches, Make1L increase (m1L), Make1Right increase (m1R), Yarn over, Cast off

--This pattern is knit in stocking knit stitch, so knitting and purling alternate rows


Pattern-
-- Start by making a garter tab--
- Cast on 3 stitches in colorway number one.
- Knit 5 rows in garter stitch.
- Knit those 3 stitches, then pick up 3 stitches from the side of the knitting and then 3 stitches from the cast on edge (9 stitches on needle)
-Wrong side of scarf/set up row- K2, P2, pm (place marker), P1, pm, P2, K2
- Right side of scarf- *K2, m1L, K2, m1R, sm (slip marker), slip stitch, sm, m1L, K2, M1R, K2
- K2, P4, sm, P1, sm, P4, K2*
-Repeat from * to * for as many rows as you would like of the first colorway. You can do a few or a bunch, it is totally up to you!
---When you want to bring in the new colorway start on a right side row leaving the first colorway yarn dangling start knitting with the new one, following the pattern from * to * the same as before. Knit those 2 rows in pattern then drop that yarn and pick back up the first colorway. PLEASE make sure to carry the yarn up the side LOOSELY so that edge does not pull in!!!
----A trick that I used to keep it loose was, in between those first 2 KNIT stitches of every row do a yarn over. When you get to that spot on the next row DO NOT KNIT THE YARN OVER just drop it. The extra yarn will just make those edge stitches looser. It works like a dream. I do it on both sides just so it is easier for me to keep in that pattern.

---The stitch in between the markers gets slipped every right side row and purled on the wrong side rows. This gives a wicked column running up the center of your scarf.
----The purl bumps are made by knitting a row on the "wrong side" instead of purling it. I did mine randomly when I felt like it or if I really loved the color that I was knitting. Have some fun with it! Show that yarn off!

- Keep knitting in pattern switching yarns every 2 rows until your scarf is big enough for your liking. Try it on (on scrap yarn if your circular needles are not big enough) and see if you like how long the "neck edge" is, if it wraps enough around. If yes then start on border, if not then keep knitting!

--Border--
I prefer the look of a solid garter stitch border. It gives a nice solid edge to the scarf and best of all, when knit long enough it keeps the edge from curling. Feel free to substitute in any sort of edging you like. Make it your own!
- Using only 1 colorway now (you can cut the other yarn off leaving a nice tail to weave in) keeping with the increase pattern in between the * to * knit BOTH rows until your border is as wide as you want it. Mine are about 2- 3 inches wide. I also like to continue to do the center slipped stitch through out the border.
-CAST OFF LOOSELY!
- Weave in ends and you are done!

Long Noro Armwarmers with Lace Detail

I still have yet to revise this pattern but I thought I could at least leave the link to the original "pattern" that is on Craftster.

***Long Noro Armwarmers***
***Ravelry Link To Pattern Page***